CPM Schedule Analysis: Easiest Guide on The Internet

Did you know that 70% of construction projects face delays, and more than 50% go over budget? Every extra day costs money, damages reputations, and wastes resources. The good news? These delays are avoidable CPM (Critical Path Method) Schedule Analysis is the key to keeping your project on time and under budget—but most guides make it sound way more complicated than it needs to be. What if you had a simple, no-nonsense guide that cuts through the confusion? This article breaks down CPM Schedule Analysis in the easiest, most practical way possible—no fluff, just actionable insights. Let’s get started. How to Do CPM Schedule Analysis: Step by Step 1. Gather Your Project Schedule Start with your project schedule in Primavera P6, Microsoft Project, Opteam, or any scheduling tool. Make sure all tasks, durations, and dependencies are added. 2. Identify the Critical Path The Critical Path is the longest sequence of tasks that determines the shortest project duration. If any task on this path is delayed, the entire project is delayed.👉 Opteam automatically highlights the Critical Path, helping you spot delays instantly. 3. Check for Total Float Float (or slack) tells you how much a task can be delayed without delaying the entire project. 4. Look for Constraints and Logic Issues 5. Analyze Delays and Risks 6. Optimize the Schedule 7. Run Schedule Updates Regularly That’s it! CPM Schedule Analysis is all about spotting risks early and making adjustments before they turn into major problems. Common Mistakes in CPM Schedule Analysis (And How to Avoid Them) Common Mistake How to Avoid It Not Updating the Schedule Regularly Update the schedule weekly or bi-weekly to reflect real-time progress. Ignoring the Critical Path Always check and track the Critical Path to avoid unexpected delays. Overloading the Schedule with Constraints Use constraints only when necessary and avoid excessive restrictions. Mismanaging Float Monitor float values to optimize flexibility without delaying the project. Not Considering Resource Availability Ensure that resource allocation aligns with task demands and availability. Failing to Adjust for Delays Adjust the schedule proactively when delays occur instead of reacting late. Overlooking External Dependencies Identify and track external factors like permits, material delivery, and approvals. Get a Solid CPM Schedule for Your Project We create a CPM schedule for you in Primavera P6, following all required specs. It includes resource loading, cost estimates, and an optimized project timeline—so you start with a solid plan. Then with Opteam, you can check your schedule’s health, track progress, and spot delays before they happen. Stay on top of your project with real-time insights and data-driven decisions. Let’s build your schedule—get in touch today!
Top 10 Construction Contractors Softwares

Hey there, fellow contractor! We know managing construction projects can be a lot, from keeping track of timelines and budgets to coordinating with your team. But what if there was a way to make it all easier? With the right construction contractors software, you can simplify your processes and focus more on what you do best. In this list, we’ll walk you through 10 of the best software options available today, so you can find the perfect tool to help you stay organized, improve efficiency, and take your business to the next level. Let’s dive in! Construction Contractors Software Best For Opteam Best Overall Procore Large-scale projects Buildertrend Project coordination CoConstruct Custom home builders ConstructConnect Estimating & takeoff JobProgress Mobile contractors RedTeam Commercial contractors BuilderStorm Scheduling & budget tracking Aconex Large teams & project portfolios Fieldwire Jobsite collaboration 1- Opteam As a contractor, you know how tough it can be to stay on top of everything happening on a project—whether it’s tracking progress, managing budgets, or communicating with the team. Traditional construction software often leaves you waiting for outdated biweekly reports, forcing you to make decisions with incomplete information. But what if you could get updates in real-time, no waiting? With Opteam, you’ll never miss a beat. The platform automatically collects progress data through WhatsApp, cutting your team’s tracking time by 80%. That means you can focus more on actual work and less on chasing down updates. Track Your Project in Real-Time Imagine having an up-to-the-minute overview of your project’s progress—whenever you need it. Opteam lets you check your project’s health score, spot errors, and flag potential risks right from the dashboard. You’ll always know exactly where your project stands, without relying on spreadsheets or late reports. Get Instant, Actionable Reports Gone are the days of waiting days or weeks for progress reports. Opteam gives you real-time reports that you can access from any device, whether you’re on-site or in the office. No more scrambling to pull together data—everything is in one place, ready for you to act on. No More Setup Hassles Setting up Opteam is a breeze. Simply upload your project schedule, and the platform does the rest, mapping everything out for you instantly. No complicated setup, no learning curve—just drag, drop, and get started. Ready to make your life easier and your projects more efficient? Try Opteam for free and experience the difference. 2- Procore If you’re managing large-scale construction projects, Procore is built with you in mind. It provides a powerful platform that lets you keep track of everything in one place—from financials to scheduling and project updates. With Procore, you can centralize your team’s communication, reduce costly errors, and improve collaboration across the board. The software also helps you stay on top of budgets and deadlines, offering tools for tracking costs and measuring project performance. 3. Buildertrend Buildertrend is perfect for contractors who need an all-in-one tool for managing projects. It offers features for scheduling, budgeting, and client communication, helping you stay organized and on track from start to finish. 4. CoConstruct CoConstruct is ideal for custom home builders, offering a streamlined platform for budgeting, scheduling, and managing client relationships. It helps you stay on top of every detail, making your job simpler and more efficient. 5. ConstructConnect ConstructConnect focuses on estimating and bidding, allowing contractors to streamline the pre-construction phase. With tools for collaboration and accurate takeoffs, it’s a great choice for those looking to simplify their bidding process. 6. JobProgress JobProgress helps contractors manage their jobs from anywhere with mobile access. It offers easy job tracking, invoicing, and scheduling, making it an affordable choice for smaller to mid-sized contractors. 7. RedTeam RedTeam is designed for commercial contractors, offering robust tools for project management, financial tracking, and collaboration. It helps keep projects on budget and on schedule, making complex projects easier to manage. 8. BuilderStorm BuilderStorm specializes in scheduling, budget tracking, and document control. It’s an excellent option for contractors looking to streamline their processes and improve communication with subcontractors and team members. 9. Aconex Aconex is ideal for large teams managing complex projects. It offers top-notch document control, communication tools, and project management features, ensuring that all stakeholders stay connected and informed. 10. Fieldwire Fieldwire is great for jobsite collaboration. It provides task management, blueprint access, and real-time updates, helping field teams stay organized and keep the project moving smoothly. Final Words Choosing the right construction contractors software can make all the difference in how smoothly your projects run. Whether you need real-time tracking, better scheduling, or improved budgeting, there’s a tool out there to fit your needs. Take the time to explore your options and find the best fit for your business. The right software won’t just save you time—it will help you deliver better results, stay on budget, and grow your construction company with confidence.
What is a CPM Schedule in Construction?

magine you’re building the coolest treehouse ever. You’ve got wood, nails, and a solid plan—but when do you build the ladder? Before the roof, right? Otherwise, how would you even get up there? That’s kind of what a CPM schedule does in construction. CPM stands for Critical Path Method, and it’s like a super-detailed to-do list that keeps big projects, like skyscrapers and highways, on track. Without it, everything could get messy—workers might show up too early, materials could arrive too late, and the whole project could take forever. But with a CPM schedule, every step is planned perfectly. It shows which tasks must happen on time and which ones have a little wiggle room. That way, construction teams can avoid delays, save money, and finish projects on schedule. Let’s break it down and see why this tool is a game-changer in construction! What is a CPM Schedule? A CPM schedule is like a master game plan for a construction project. It lists every task that needs to be done, when it should start, and how long it will take. But the real magic? It shows the critical path—the chain of tasks that absolutely must stay on schedule, or the whole project gets delayed. Think of it like dominoes: if one falls late, the rest get pushed back too. To make this schedule, construction teams figure out which tasks depend on others, like how you can’t paint a wall before building it. Then, they use a timeline to map out the fastest way to finish the project. This helps teams avoid wasting time, plan better, and finish construction as smoothly as possible. Why a CPM Schedule is Important? 1- Prevents Delays – By identifying the most critical tasks, a CPM schedule helps ensure that work stays on track. If any of these tasks are delayed, the entire project could suffer. 2- Optimizes Resources – Labor, materials, and equipment are expensive. CPM scheduling ensures they are used efficiently, reducing idle time and unnecessary costs. 3- Improves Cost Control – According to a study in the Journal of Construction Engineering and Management, 66.7% of contractors create a CPM schedule even when it’s not required, proving its value in keeping projects financially and logistically organized. 4- Enhances Communication – A CPM schedule gives clear deadlines and dependencies, so everyone—contractors, subcontractors, and stakeholders—is on the same page. 5- Reduces Risks – Construction projects are full of uncertainties. A CPM schedule helps teams anticipate potential bottlenecks and develop contingency plans. When Do You Need One? A CPM schedule is created during the planning phase of a construction project, before any actual work begins. It’s needed after the project scope, budget, and timeline are defined but before construction starts. This step helps organize tasks, set deadlines, and ensure that everything is scheduled efficiently. Once the project is underway, the CPM schedule is updated regularly to track progress, adjust for delays, and keep everything on schedule. Key Components of a CPM Schedule Component Description Activities The individual tasks that need to be completed in the project. Dependencies The relationships between tasks (e.g., one task must be completed before another can start). Duration The estimated time required to complete each task. Critical Path The longest sequence of dependent tasks that determines the shortest time to complete the project. Float (Slack) The amount of time a task can be delayed without affecting the overall project timeline. Milestones Key points in the project that mark major achievements or deadlines. Resources The labor, materials, and equipment needed for each task. Baseline Schedule The original approved schedule used as a reference to track progress. Updates & Revisions Adjustments made to the schedule to reflect changes, delays, or progress updates. Common Challenges in CPM Scheduling 1- Inaccurate Time Estimates – Sometimes, the time needed for tasks is estimated incorrectly. This can lead to delays if tasks take longer than expected. It’s important to review these estimates regularly and make adjustments as needed. 2- Unforeseen Delays – External factors like bad weather, supply chain issues, or labor shortages can delay tasks and disrupt the entire schedule. While you can’t control these factors, it’s crucial to build some buffer time into the schedule to manage them. 3- Complexity of Manual Scheduling – When CPM schedules are done manually (using spreadsheets or paper), it’s easy to make mistakes or miss updates. Tracking dependencies, timelines, and changes can become overwhelming as the project grows. This often results in errors, missed deadlines, and inefficiencies. Opteam Construction Progress Tracking Software can solve this problem by automating the process. It streamlines the creation and management of CPM schedules, helping project managers stay on top of changes, track progress in real-time, and adjust schedules quickly with minimal effort. This reduces the risk of errors and keeps the project on track without the hassle of manual updates (try it here free, you will thank yourself later) 4- Resource Allocation Issues – Managing resources like labor, materials, and equipment can get tricky, especially when there are conflicts or shortages. A good CPM schedule helps identify resource needs upfront, but without clear visibility, it’s easy to overlook. 5- Communication Breakdowns – If the CPM schedule is not easily accessible to all team members, it can lead to miscommunication or confusion about task priorities and deadlines. Regular updates and shared visibility are essential for team coordination. Final Words In conclusion, a CPM schedule is a powerful tool that helps keep construction projects organized, on time, and within budget. By clearly mapping out tasks, timelines, and dependencies, it ensures that teams stay coordinated and that potential delays are anticipated and managed. While creating and maintaining a CPM schedule can be challenging, especially with manual processes, modern tools like Opteam Construction Progress Tracking Software can simplify the process, reduce errors, and improve efficiency. Whether you’re managing a small project or a large-scale construction effort, using a CPM schedule can make all the difference in delivering success. Struggling to Create a CPM Schedule for Your Construction Project?
How Dar Al Handasah is Navigating the Tight Deadlines of a Complex Construction Project with Opteam
The Challenge Managing Aykon City 3 (Safa Two) presented significant challenges, requiring Dar Al Handasah to navigate a complex construction project with high stakes and tight deadlines. Key challenges included: With the complexity of the project and the stakes at hand, Dar Al Handasah needed a comprehensive solution to address these challenges while ensuring timely and efficient delivery of Aykon City 3. The Solution Opteam was introduced to address the complex project management challenges of Aykon City 3, providing tools to streamline progress tracking, task management, and data integration. Key solutions delivered by Opteam: Leveraging Opteam’s advanced capabilities, Dar Al Handasah overcame the challenges of managing Aykon City 3 and maintained a clear, efficient path to project completion. Expected Results The implementation of Opteam is set to deliver measurable improvements for the Aykon City 3 project: Together, these capabilities empower Dar Al Handasah to maintain control over Aykon City 3, delivering efficiency and precision throughout the project lifecycle.
Critical Delay in Construction: The Hidden Threat
Critical delays in construction projects are more common than you might think. They often lead to extended timelines and budget overruns, creating significant challenges for project teams. In fact, a study revealed that large construction projects take 20% longer to finish than planned and can exceed budgets by up to 80%. These delays can arise from poor planning, budget constraints, communication gaps, or unexpected external factors. When left unaddressed, they not only disrupt progress but also strain relationships between stakeholders and impact project profitability. The good news? With the right project management strategies, better communication, and advanced scheduling tools, you can keep your projects on track. Let’s dive in What is a Critical Delay in Construction? A critical delay in construction occurs when a project milestone or task is delayed to the point where it affects the overall project completion date. These delays typically impact critical path activities—tasks that directly influence the project’s timeline. When a critical delay happens, it can lead to extended deadlines, financial penalties, and strained relationships with clients or stakeholders. What makes critical delays especially challenging is that they often stem from a mix of factors, such as design errors, labor shortages, material delivery issues, or even unforeseen site conditions. Since critical path tasks have zero flexibility in scheduling, any delay in them requires immediate attention to avoid cascading effects on the entire project timeline. Examples on Critical Delays How to Deal with Critical Delays? Dealing with critical delays in construction requires a proactive and strategic approach. The first step is identifying the root cause of the delay through a thorough project review. Once the cause is clear, prioritize open communication among all stakeholders, including contractors, suppliers, and clients. Regular progress meetings and status updates can help ensure everyone stays informed and aligned on the next steps. Additionally, updating the project schedule with revised timelines and task dependencies is crucial for maintaining control over the project flow. Another effective strategy is resource reallocation and fast-tracking. If one phase is delayed, consider shifting resources to accelerate other non-affected tasks or work in parallel when possible. Implementing modern progress tracking tools with Gantt charts like Opteam or critical path method (CPM) software can also help visualize and manage dependencies more effectively. Ultimately, proactive risk management, combined with transparent communication and flexible scheduling adjustments, can significantly reduce the impact of critical delays on construction projects. Minimize Critical Delays with Opteam’s Smart Construction Management Tools Critical delays can derail construction projects, leading to missed deadlines, budget overruns, and strained stakeholder relationships. Opteam provides a smarter way to manage construction timelines by giving you real-time visibility into project progress, so you can identify and address delays before they escalate. With automated progress tracking and dynamic scheduling, staying on top of critical tasks has never been easier. When a delay occurs, fast decision-making is essential. Opteam’s intuitive dashboards allow you to instantly assess project health, track critical path activities, and reassign resources where they’re needed most. With detailed insights and collaborative tools, teams can maintain clear communication and adjust timelines in real-time, keeping everyone aligned and minimizing disruption. Opteam isn’t just about tracking delays — it helps you prevent them. Start your free trial now & test it yourself.
5 Proven Strategies to Track Multiple Construction Projects at Once

Construction delays can be a real headache. On average, projects get delayed by over 46 days, which often means extra costs, frustrated clients, and sometimes even legal trouble. Nobody wants that kind of stress, especially when it can hurt your business’s reputation and bottom line. The reasons for delays are pretty common — supply issues, labor shortages, poor planning, and unexpected site problems. Sometimes, it’s just a simple case of miscommunication or last-minute design changes throwing everything off track. And let’s not forget external stuff like bad weather or permit hold-ups that can completely mess up your schedule. The good news? A lot of delays can be avoided with the right approach. Clear communication, solid scheduling, a good tracking software, and keeping everyone on the same page can make a huge difference. Plus, having clear terms in your contract about delay notices helps everyone stay accountable and keeps projects moving without unnecessary disputes. Stick around — we’re about to dive into five proven strategies to help you stay on top of multiple construction projects without the stress. Ready to take control and keep everything running smoothly? Let’s get started! 1- Use Centralized Project Management Software Trying to juggle multiple construction projects with spreadsheets and endless emails can get messy fast. A centralized project management software brings everything together in one place, making it easier to track progress, deadlines, and resources across all your sites. With the right tool, you can assign tasks, monitor timelines, and track budget updates from a single dashboard. This means less time chasing updates and more time focusing on getting the job done. Look for features like Gantt charts, real-time progress tracking, and document sharing to keep everyone on the same page. Opteam makes project tracking simple by giving you full visibility over every project in one powerful platform. With features like automated schedule updates, easy task assignments, and a modern interface, Opteam helps you stay in control — no matter how many projects you’re managing (give it a try here, you can create an account for free). 2- Set Clear Milestones and Performance Metrics Keeping track of multiple construction projects becomes much easier when you break them down into clear milestones and measurable performance metrics. Instead of only focusing on the project’s start and end dates, set key checkpoints along the way to monitor progress effectively. Milestones can be tied to critical stages like foundation completion, structural work, or final inspections. By defining these points upfront, you can easily track whether your projects are staying on schedule and quickly identify any areas falling behind. Pair these milestones with performance metrics like task completion rates, resource usage, and budget adherence for a complete performance overview. 3- Standardize Communication Channels When managing multiple construction projects, scattered communication can lead to confusion, missed updates, and costly mistakes. Standardizing how your team communicates helps keep everyone informed and aligned across all projects. Create a clear communication plan that specifies which tools to use for different types of updates—like project announcements, task progress, or issue reporting. For example, use a project management platform for daily updates and progress reports, while reserving emails for formal approvals and important notices. 4- Implement Real-Time Progress Tracking Relying on outdated reports or end-of-week updates can leave you in the dark when managing multiple construction projects. Real-time progress tracking ensures you stay informed about every project’s status as it unfolds, helping you make faster, data-driven decisions. By adopting tools that provide live updates on task completion, resource allocation, and budget status, you can quickly identify bottlenecks and take corrective actions. This approach also promotes accountability, as team members can clearly see task deadlines and responsibilities in real time. Keeping an eye on real-time data not only helps you catch issues early but also empowers your team to stay proactive and maintain steady project momentum. 5- Optimize Resource Allocation Poor resource management is a leading cause of construction delays and budget overruns. Balancing labor, materials, and equipment across multiple sites requires careful planning to avoid shortages or underutilization. Start by mapping out resource needs for each project phase and ensuring they align with your timelines. Regularly review resource availability and adjust as needed to avoid conflicts between sites. Cross-training team members can also help create a more flexible workforce, capable of filling gaps when necessary. With better resource planning, you can prevent downtime, keep your projects running efficiently, and maximize productivity across all your construction sites. Final Words .. Tracking multiple construction projects doesn’t have to be overwhelming. With the right strategies—like using centralized tools, setting milestones, standardizing communication, tracking progress in real-time, and optimizing resources—you can stay in control and keep every project moving forward smoothly. When you have a clear system in place, meeting deadlines and staying within budget becomes a whole lot easier.
Construction Progress Reporting: Why & How?

Construction progress reporting is like a roadmap for building projects. It shows what’s been done, what’s next, and any challenges along the way. This simple process helps everyone involved stay informed and work together effectively to keep the project on track. By sharing updates regularly, teams can spot problems early and make quick adjustments. This prevents delays and keeps costs under control, making sure the project runs smoothly. A good report is easy to understand and includes key details like completed tasks, upcoming deadlines, and any issues. Adding pictures or charts makes the information even clearer. In short, progress reporting is an essential tool that keeps construction projects organized and successful from start to finish. What is Construction Progress Reporting? Construction progress reporting is a way to keep track of how a building project is going. It explains what work has been finished, what still needs to be done, and if there are any problems slowing things down. These reports help everyone involved stay on the same page and make sure the project is moving forward as planned. Why do we Need a Progress Report? Progress reports are essential in construction projects because they keep everyone informed, organized, and focused on the project’s goals. Here’s why they’re important: What Does a Construction Progress Report Include? A construction progress report includes key details about the status of a building project. It typically covers: This information helps keep everyone informed and ensures the project stays organized and on track. How to Report Construction Progress Reporting construction progress effectively requires a combination of good practices and the right tools. Here’s how you can do it: 1- Gather Accurate Information Regularly collect data from the construction site, including completed tasks, ongoing work, and challenges. Use this information to ensure your updates are reliable. 2- Use Progress Tracking Software Software tools are essential for modern construction progress reporting. They help automate report creation, provide real-time updates, and make collaboration easier. Options like Procore, Buildertrend, and PlanGrid are widely used for their ability to streamline reporting and communication.Why Choose Opteam?For teams looking for a user-friendly and effective solution, Opteam Construction Progress Tracking Software is an excellent choice. Opteam simplifies tracking with real-time updates, customizable dashboards, and automated reporting features. It’s designed to save time, reduce errors, and keep everyone on the same page—perfect for projects of any size. Create your free account now & experience first-hand how can Opteam streamline your progress tracking efforts. 3- Share Reports Effectively Once your report is ready, distribute it to all stakeholders promptly. Make sure it’s easy to read, with visuals like photos and charts to provide clear insights. Read more:
10 Important KPIs in a Construction Project You Need to Be Tracking

Imagine the excitement of breaking ground on a new construction project—every detail planned, every resource allocated—only to watch deadlines slip and costs skyrocket. It’s a frustrating reality for many, but the good news is, it’s avoidable. Tracking the right Key Performance Indicators (KPIs) can be the difference between a seamless project and one that’s constantly firefighting. These metrics aren’t just numbers; they’re your guide to staying on track and achieving success. Take Schedule Variance, for example. With studies showing that large construction projects typically take 20% longer than expected, tracking this KPI can help you spot delays early. Instead of reacting to setbacks, you can anticipate them, ensuring your project progresses smoothly and on time. Cost management is another common challenge, with 85% of projects experiencing budget overruns averaging 28%. By keeping an eye on the Cost Performance Index, you can assess whether your spending aligns with your progress and avoid the pitfalls of financial mismanagement. And then there’s safety, an area no one can afford to overlook. Construction remains one of the most hazardous industries, with thousands of workplace injuries reported annually. Monitoring safety KPIs can help protect your workers while keeping your project on schedule and your reputation intact. By focusing on these essential KPIs in a construction project, you’ll not only stay on track but also build a foundation of trust, efficiency, and success. These metrics are more than tools—they’re the compass that keeps your vision alive. 1- Schedule Variance (SV) Time is one of the most critical resources in any construction project. Schedule Variance (SV) measures the difference between planned and actual progress, helping project managers pinpoint where timelines are slipping. For example, if a phase of the project was scheduled to complete in 30 days but has taken 35, the variance is a clear signal that adjustments are needed. This metric helps teams act proactively, minimizing delays that could cascade into larger issues. However, SV isn’t just about identifying problems; it’s also a tool for better planning. Analyzing past variances allows project managers to refine future schedules, making them more realistic and achievable. Studies show that projects with regular SV monitoring are 40% more likely to meet deadlines. By keeping this KPI at the forefront, teams can stay aligned with client expectations and contractual obligations. 2- Cost Performance Index (CPI) Managing costs in construction is notoriously challenging. CPI compares the budgeted cost of completed work to the actual cost incurred, providing a clear snapshot of cost efficiency. For instance, if the CPI value is less than 1, it signals overspending, prompting immediate investigation into cost overruns. This KPI is vital in large-scale projects where even minor inefficiencies can snowball into significant financial burdens. Beyond current performance, CPI enables better forecasting and long-term financial planning. It allows project managers to adjust resource allocation, renegotiate supplier contracts, or implement cost-saving measures. By prioritizing CPI, construction teams not only manage their budgets effectively but also build trust with stakeholders by delivering cost-efficient results. 3- Earned Value (EV) Earned Value is the heartbeat of project tracking, as it combines budget and schedule performance into a single metric. EV calculates the value of work actually completed compared to what was planned, helping managers identify if a project is on track. For example, if 50% of the budget is spent but only 30% of the work is completed, EV highlights inefficiencies immediately. This metric goes beyond tracking—it empowers decision-making. With EV, project teams can reallocate resources to priority areas or adjust timelines without losing control. Many successful construction firms use EV to present stakeholders with a transparent view of progress, ensuring alignment between client expectations and actual performance. 4- Safety Incident Rate Construction remains one of the most dangerous industries, with thousands of injuries reported annually. Safety Incident Rate measures the number of reported incidents relative to hours worked, highlighting areas where additional precautions are needed. A lower incident rate not only ensures worker well-being but also reduces downtime caused by accidents. Focusing on this KPI also strengthens team morale and trust. Workers are more motivated and productive when they feel safe, and clients are more likely to choose contractors with a strong safety track record. By incorporating advanced training programs and safety technologies, teams can minimize incidents and maintain uninterrupted progress. 5- Labor Productivity Labor Productivity measures the output of a workforce compared to the time and resources invested. For example, tracking how many units of work a team completes per day provides insight into efficiency. This KPI helps identify whether delays stem from underperformance or external factors like material shortages. Improving labor productivity isn’t just about working faster—it’s about working smarter. Tools like task-specific training and advanced scheduling software can streamline operations, ensuring every hour on-site counts. Monitoring productivity also allows managers to reward high-performing teams, fostering a culture of excellence. 6- Budget Variance Budget Variance tracks the difference between estimated and actual costs, offering a clear view of financial health. If variance increases consistently, it’s a red flag that costs are spiraling out of control. For instance, unexpected material price hikes or mismanaged subcontractor agreements often lead to budget deviations. This KPI also serves as a learning tool. By analyzing variance patterns, teams can improve future cost estimates and avoid repeating mistakes. Projects with lower budget variance rates often attract more clients, as they demonstrate superior financial planning and reliability. 7- Change Order Percentage Construction projects rarely go exactly as planned. Change Order Percentage measures the proportion of scope changes compared to the original contract. High percentages often indicate planning issues, while lower percentages reflect well-managed expectations and adaptability. Tracking this KPI helps identify recurring issues, like incomplete designs or miscommunication with clients. By addressing the root causes of frequent changes, teams can improve workflows and build stronger relationships with stakeholders. 8- Equipment Utilization Rate Idle equipment represents lost money. This KPI measures how efficiently construction machinery and tools are used, ensuring that assets don’t sit unused for long periods. High utilization rates indicate effective resource management,
Free Construction Daily Log Generator (PDF)
Generate PDF Construction Daily Logs In Simple Clicks Company Name: Project Name: Team Members: Reporter Name: Report Date: Project Details Task Name: Details: Hours Spent: Issues Encountered: Materials Used: Upload Task Images: Generate Log PDF Download Log PDF Tips and Best Practices for Construction Daily Logs and Reporting Accurate and detailed daily logs are essential for the success of any construction project. They ensure clear communication, help resolve disputes, and provide a reliable record of progress. Here are some tips and best practices to create effective construction daily logs and reports: 1. Be Consistent with Documentation Log information daily without skipping days. Use a standardized template or software for uniformity. Ensure logs are timestamped for future reference. 2. Include Key Details A complete daily log should cover: 3. Be Objective Record facts, not opinions or assumptions. Avoid exaggerations or omissions. Use photos or videos as supporting evidence for visual clarity. 4. Leverage Technology Use digital tools and mobile apps to streamline data collection and reporting like Opteam. Implement cloud-based platforms for real-time updates and easy collaboration. Automate repetitive tasks, such as generating PDFs or summaries. 5. Highlight Changes Note any deviations from the original plan, such as schedule changes, scope alterations, or unexpected issues. Specify how these changes might impact the project’s timeline or budget. 6. Ensure Accuracy Double-check entries for errors or missing information. Use precise language to avoid misunderstandings. Verify material quantities and equipment usage with onsite staff. 7. Maintain Security and Accessibility Keep reports securely stored, preferably in a cloud-based system. Limit access to authorized personnel while ensuring they can retrieve logs as needed. 8. Train Your Team Educate onsite staff about the importance of daily logs and reporting. Provide training on tools or templates they’ll use. Encourage timely submissions to avoid last-minute errors. 9. Use Logs for Continuous Improvement Analyze logs regularly to identify recurring issues or inefficiencies. Use insights to improve planning, reduce delays, and optimize resource allocation. Keep logs handy for post-project reviews to enhance future project strategies. 10. Follow Legal Requirements Ensure logs comply with local regulations and contract obligations. Include the necessary documentation to prevent disputes or claims. Store reports for the legally required duration to protect your company. Benefits of Effective Construction Daily Logs Improved accountability: Everyone knows their tasks and responsibilities. Enhanced communication: Clear logs minimize misunderstandings. Dispute resolution: Detailed logs act as evidence for claims or disagreements. Better project tracking: Logs provide an accurate view of progress and potential delays. By adopting these tips and best practices, construction managers can ensure smooth operations, reduce risks, and achieve project goals efficiently.
P6 Construction Scheduling Guide: 7 Practical Steps & 12 Pro Tips
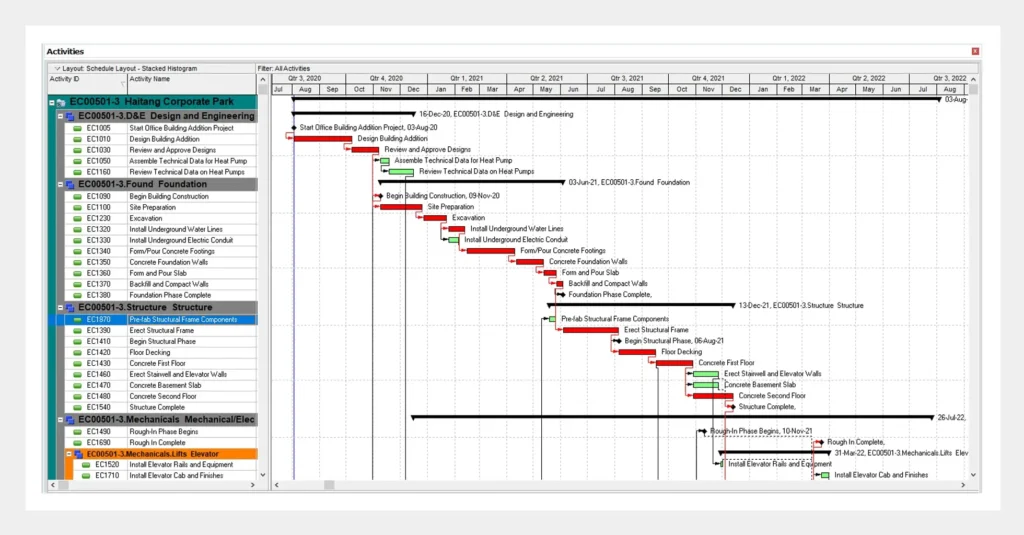
In short: Primavera P6 is the industry standard for complex construction project scheduling. But creating a P6 schedule that’s clear, realistic, and optimized for execution? That’s where most teams get stuck. In this guide, we’ll walk through how to build a P6 construction schedule from scratch, step by step, with advanced P6 scheduling tips that contractors, project managers, and planners use every day to stay on track and avoid costly delays. Whether you’re working on a new project, refining your P6 project schedule, or exploring how to use Primavera P6 in construction, this guide gives you everything you need to know, from WBS setup to Critical Path analysis. 7 Steps to Build a P6 Construction Schedule 1. Set Up Your P6 Project Start by creating a new project in Primavera P6. Enter essential details like project name, start date, and a unique Project ID. This sets the foundation for the entire P6 schedule. 2. Create the Work Breakdown Structure (WBS) The WBS is where your planning begins. Break your construction project into clear sections—like foundations, structure, and MEP—within the WBS tab. This helps organize your P6 construction schedule into logical phases. 3. Add Activities to the Schedule Under each WBS element, list the specific activities required. Set durations, activity IDs, and other fields. This is the heartbeat of your P6 project schedule. 4. Set Logical Relationships Between Activities Link tasks using Finish-to-Start (FS), Start-to-Start (SS), or other relationships. These connections define the flow of your Primavera P6 construction schedule. 5. Assign Resources to Activities Allocate resources like labor, equipment, and materials. This helps track workload, costs, and availability, making your Primavera P6 schedule more realistic. 6. Add Constraints, Deadlines & Milestones Use constraints and deadlines to align your activities with contractual milestones. Managing these in P6 ensures your construction schedule meets critical project dates. 7. Finalize & Review Using Critical Path Check your schedule using the Critical Path Method (CPM). This highlights the activities that directly impact your project’s finish date, an essential part of construction project control in Primavera P6. 12 Expert Tips to Improve Your P6 Schedule 1. Start With a Strong WBS A solid WBS simplifies construction scheduling in P6 and helps with cost control and reporting. 2. Use Activity Codes Group and filter activities using activity codes for faster navigation of large P6 project schedules. 3. Customize Your Calendars Different teams, locations, or shifts? Tailor calendars in P6 to reflect actual working conditions. 4. Be Precise With Activity Relationships Clear logic ensures your Primavera construction schedule is robust and won’t fall apart under changes. 5. Monitor the Critical Path Regularly Check the CPM often to catch bottlenecks early and keep your P6 construction schedule optimized. 6. Use Global Change Features Bulk-update tasks when needed without manually editing each one—saves time and avoids errors. 7. Manage Float and Lag Carefully Understand and control float to ensure flexibility without risking critical deadlines. 8. Keep Resource Assignments Realistic Avoid over-allocating workers or equipment. A P6 schedule should match the ground reality. 9. Update and Track Baselines Create and maintain schedule baselines to track changes over time and manage delays effectively. 10. Perform a Schedule Clean-Up Before Submission Fix out-of-sequence logic, negative float, or missing relationships before presenting or exporting. 11. Customize Layouts for Each Use Case Tailored layouts help when you’re updating, reviewing, or reporting on progress in your Primavera P6 construction schedule. 12. Export Clean, Filtered Reports Keep stakeholders happy with concise reports filtered by WBS, responsibility, or phase. 🧠 Try This: Download a Fully Interactive P6-Compatible Schedule in Excel (Free) You don’t need a Primavera license to start planning like a pro. We built a powerful Excel-based construction scheduling tool that mirrors core P6 logic, including WBS setup, predecessor linking, critical path identification, and progress tracking. 🔧 What’s inside the file? 💡 Pro tip: This sheet is designed to help you plan, simulate, and track construction projects with a P6-style logic — even if your team isn’t using Primavera yet. 📥 Download the Excel tool now and start building smarter schedules: 👉 Download the Ultimate Construction Schedule Template (Excel) Want to skip the manual work altogether? You can do all this in under 2 minutes with Opteam, no formulas, no spreadsheets, just clean dashboards, real-time updates, and automated logic checks. 👉 Try Opteam for free — no credit card needed. Final Word: Why P6 Scheduling Matters A well-built P6 construction schedule isn’t just a document—it’s a live control system for your entire project. The better it’s planned, the fewer surprises you’ll face on site. Whether you’re new to Primavera P6 or looking to level up your construction scheduling game, these steps and pro tips will help you build smarter, track better, and deliver faster. Frequently Asked Questions About P6 Construction Scheduling What is a P6 schedule? A P6 schedule is a project schedule created using Oracle Primavera P6. It’s commonly used in the construction industry to manage timelines, allocate resources, track progress, and monitor project deadlines. It’s known for its ability to handle large-scale, complex projects with thousands of activities. How do I create a construction schedule in Primavera P6? To create a construction schedule in Primavera P6, you’ll need to follow these main steps: Each of these steps is essential to ensure your schedule reflects the real-world sequence of events on-site. Why is the Critical Path important in a P6 project schedule? The Critical Path is the sequence of tasks that directly affects your project’s finish date. If any task on the critical path is delayed, the entire project will be delayed. Monitoring it helps you prioritize and allocate resources where it matters most to stay on track. What are the benefits of using Primavera P6 in construction projects? Primavera P6 helps construction teams plan accurately, track progress in real time, and manage delays effectively. It allows you to: Can I export reports from my P6 construction schedule? Yes, Primavera P6 offers robust reporting capabilities. You can export activity layouts, resource assignments, progress updates, and