Work Breakdown Structure In Construction: More than a Chart

A Work Breakdown Structure in construction is one of the most effective tools for organizing complex projects into manageable pieces. By breaking down a project into tasks, deliverables, and milestones, teams gain clarity on scope, responsibilities, and progress tracking. This structured approach not only improves planning and resource allocation but also helps contractors, consultants, and project owners stay aligned from start to finish. In this guide, we’ll explain what a Work Breakdown Structure (WBS) is, why it matters in construction projects, and provide a practical template you can use to build your own. What is Work Breakdown Structure (WBS)? A Work Breakdown Structure (WBS) is a project management tool that organizes a project into smaller, more manageable components. Instead of looking at a construction project as one massive task, the WBS breaks it down into hierarchical levels—starting with broad deliverables and narrowing down into specific tasks and work packages. Each level provides more detail, helping project teams understand exactly what needs to be done, who is responsible, and how progress will be measured. In construction, a WBS is especially valuable because projects often involve multiple trades, subcontractors, and complex schedules. By using a structured breakdown, project managers can allocate resources effectively, reduce confusion, and minimize the risk of overlooking critical tasks. It also creates a clear framework for estimating costs, tracking progress, and reporting, making the WBS a cornerstone of successful project planning and execution. Why WBS is Important in Construction Projects? A Work Breakdown Structure (WBS) is critical in construction because it brings structure and clarity to projects that are often complex, large-scale, and involve many stakeholders. By breaking the project into smaller, defined work packages, the WBS ensures that every task is accounted for and no scope elements are overlooked. This reduces ambiguity, improves coordination between contractors, consultants, and owners, and provides a clear roadmap for project execution. Beyond clarity, the WBS also drives better control over time, cost, and quality. It allows project managers to assign responsibilities, allocate resources more accurately, and monitor progress against a structured baseline. In practice, this means fewer delays, improved communication across teams, and stronger alignment between planned and actual performance. In short, the WBS acts as both a planning tool and a management tool, making it essential for keeping construction projects on track. Key Elements of a Construction Work Breakdown Structure A good WBS in construction isn’t just a list of tasks—it’s a structured hierarchy. To make it effective, several elements need to be included: Together, these elements create a clear framework that connects the big picture to the daily activities on-site. How to Create a Work Breakdown Structure Step by Step Creating a WBS for a construction project involves a logical flow. Here’s a simple process you can follow: Following these steps ensures your WBS is complete, realistic, and aligned with how the project will actually be built. Work Breakdown Structure Example for a Construction Project To see how this works in practice, imagine a mid-rise building project. A simplified WBS might look like this: Level 1 – Building Project Level 2 – Foundation Excavation Reinforcement Concrete pouring Level 2 – Superstructure Columns and beams Slabs Level 2 – Finishes Masonry Plastering Painting This hierarchy can be expanded further for more detail, but even at this level, it provides structure and a shared understanding of project scope. Common Mistakes to Avoid When Building a WBS Even though a WBS is simple in concept, many teams stumble during execution. Some common pitfalls include: Final Thoughts on WBS in Construction A Work Breakdown Structure is more than just a chart — it’s the foundation of effective planning and communication in construction. By breaking down complex projects into manageable deliverables, teams can align on scope, avoid surprises, and monitor progress with confidence. When done right, a WBS isn’t just paperwork; it’s a tool that keeps projects on time, on budget, and on scope.
What is Forensic Schedule Analysis in Construction?

Forensic Schedule Analysis in construction is the process of examining project schedules to determine the causes and impacts of delays or disruptions. It is typically used after disputes arise between project stakeholders, such as owners, contractors, or consultants, regarding responsibility for missed deadlines, cost overruns, or extended project durations. By analyzing baseline schedules, updates, and actual progress data, forensic experts aim to reconstruct what happened on the project and identify how specific events influenced the overall timeline. This analysis is often applied in claims, litigation, or arbitration to provide objective evidence on delay responsibility. Methods such as “as-planned vs. as-built,” “time impact analysis,” and “but-for” analysis are commonly used to assess how particular activities or changes affected the project. The ultimate goal is to establish a clear link between the delay events and their consequences, helping decision makers determine accountability and financial implications. Why Forensic Schedule Analysis Matters in Construction Projects Construction projects are often complex, involving multiple contractors, consultants, and stakeholders, which makes delays almost inevitable. When deadlines are missed, disputes quickly arise over who is responsible and what financial impact the delay caused. This is where forensic schedule analysis becomes critical—it provides a fact-based way to evaluate how delays occurred and who should be held accountable. Without such analysis, claims often rely on assumptions or incomplete records, leading to prolonged conflicts and costly litigation. By using forensic schedule analysis, project teams gain clarity on the cause-and-effect relationship between delays and project outcomes. It ensures accountability, supports fair dispute resolution, and helps stakeholders protect their contractual and financial interests. Beyond disputes, this analysis also provides valuable lessons for future projects, highlighting weak points in planning, coordination, or risk management. For organizations that want to minimize claims and strengthen delivery performance, forensic schedule analysis is not just a legal tool—it is a foundation for smarter project management. Common Methods of Forensic Schedule Analysis There are several established methods that experts use to perform forensic schedule analysis in construction, each with its own strengths and applications. The choice of method often depends on the quality of available project records, the complexity of the delay events, and the purpose of the analysis—whether it is for internal understanding, negotiation, or formal dispute resolution. As-Planned vs. As-Built Analysis This approach compares the original project schedule with the actual sequence of events. It highlights where and when delays occurred but is often criticized for being overly simplistic, as it does not account for changes or revisions during the project. Read more about As-Planned vs. As-Built Analysis Time Impact Analysis (TIA) Considered one of the more reliable methods, TIA measures the impact of specific delay events by inserting them into the project schedule and observing how the completion date is affected. This makes it highly effective for assessing entitlement to time extensions. Read more about Time Impact Analysis (TIA) But-For Analysis Also called “subtractive analysis,” this method removes a delay event from the schedule to show how the project would have progressed without it. It is commonly used in dispute resolution to demonstrate the direct influence of a specific delay on the overall project completion. Read more about But-For Analysis Each method provides a different perspective, and in many cases, experts may apply more than one to strengthen their conclusions. Selecting the right methodology is crucial for ensuring fairness and credibility in construction claims and disputes. Key Benefits of Using Forensic Schedule Analysis Implementing forensic schedule analysis provides significant value to both contractors and project owners: In essence, forensic schedule analysis turns raw project data into actionable insights. It bridges the gap between technical scheduling records and contractual obligations, ensuring that disputes are resolved with clarity and fairness. Limitations and Challenges of Forensic Schedule Analysis While forensic schedule analysis is highly valuable, it is not without limitations. A major challenge lies in the availability and accuracy of project records. If progress updates, daily reports, or schedule revisions are missing or inconsistent, the results of the analysis may be inconclusive. Another limitation is method selection. Different methods can yield different outcomes, and stakeholders may dispute which approach is the most appropriate. Additionally, forensic schedule analysis often requires significant expertise and time, which can make it costly. Despite these challenges, when applied correctly, it remains one of the most effective tools for delay resolution in construction projects. Forensic Schedule Analysis in Construction Claims and Disputes One of the primary uses of forensic schedule analysis is in construction claims and disputes. Delays often lead to financial consequences such as liquidated damages, additional overhead costs, or extended labor expenses. To resolve these disputes fairly, objective evidence is needed to demonstrate the link between events and outcomes. Courts, arbitration panels, and dispute boards rely heavily on forensic schedule analysis to understand what really caused delays. A well-documented analysis can make the difference between winning or losing a claim. For this reason, both owners and contractors turn to experienced forensic scheduling experts to protect their interests. How Digital Tools Improve Forensic Schedule Analysis Accuracy Traditionally, forensic schedule analysis relied heavily on manual reviews of Gantt charts, Primavera P6 updates, and Excel spreadsheets. Today, digital tools and construction scheduling software are transforming this process by automating data capture, progress tracking, and reporting. Platforms like Opteam, for example, can instantly compare claimed progress versus actual site performance, send real-time alerts via WhatsApp, and automatically update schedule health checks. This reduces human error, speeds up dispute resolution, and ensures more reliable forensic analysis. By adopting modern tools, project teams can not only resolve disputes faster but also prevent many from arising in the first place. Final Thoughts on Forensic Schedule Analysis in Construction Forensic schedule analysis plays a vital role in today’s construction industry, where project delays are common and disputes are costly. By providing a structured, fact-based approach to delay evaluation, it supports fair outcomes and strengthens trust between project stakeholders. As projects continue to grow in scale and complexity, the importance of accurate scheduling and timely analysis will only increase. Organizations that
Is there a P6 Viewer?
Primavera P6 is one of the most widely used tools for construction scheduling, but there’s one challenge many teams face: not everyone needs (or wants) a full P6 license. Project managers, consultants, and clients often just want to view the schedule, check progress, or review critical activities—without learning the full complexity of the software. This leads to a common question: is there a P6 viewer? The short answer: yes. Several solutions allow you to open and view Primavera P6 schedules without needing a full installation or expensive license. These P6 viewers range from Oracle’s own limited options to third-party tools that make sharing schedules easier and more collaborative. Why would you need a P6 viewer? One modern option is Opteam, which works as a web-based P6 viewer and a powerful analysis tool. With Opteam, you can upload your .xer files instantly, view the full schedule online, and even generate progress and delay reports without digging through hundreds of activities. 👉 If you’re looking for an easy way to view and share P6 schedules, sign up here for free and try Opteam today. Why You Might Need a P6 Viewer Instead of Full Primavera Access Primavera P6 is a powerful scheduling platform, but not everyone who interacts with a project needs to master its complexities. In many cases, stakeholders simply need visibility. This is where a P6 viewer becomes invaluable. Consider these scenarios: A P6 viewer solves all of these by offering: In short, a P6 viewer is for those who need insight, not full editing power. It democratizes access to schedule data, making project collaboration smoother and more efficient. Different Ways to Open and View P6 Schedules There are multiple approaches to accessing Primavera P6 schedules without the full software. Some are official, while others come from third-party solutions. Here are the main ones: Each method has pros and cons. If you just want to open a file once, an export might be enough. But if you want ongoing access, collaboration, and reporting, dedicated P6 viewer software is the smarter choice. Best P6 Viewer Options Available Today If you’re looking for a P6 viewer, you have several options to consider. Some are simple, while others go beyond viewing into analysis and reporting. Traditional Options Third-Party Tools Modern Platforms When choosing, ask yourself: For many, modern web platforms strike the right balance—simple enough for anyone to use, but powerful enough to add real value beyond viewing. How Opteam Makes Viewing and Sharing P6 Schedules Easier While there are many ways to view P6 schedules, Opteam takes the process a step further by combining accessibility with intelligent insights. Here’s why teams use Opteam as their go-to P6 viewer: For consultants, this means they can verify contractor schedules quickly. For contractors, it means they can demonstrate progress with confidence. For clients, it means transparency without complexity. In other words, Opteam isn’t just a viewer—it’s a smarter way to manage schedules, build trust, and keep projects moving. 👉 Try it today: Sign up for free and experience how easy it is to view and share P6 schedules.
What Are Construction Disputes? Causes & Solutions Explained

Construction disputes are conflicts that arise during the planning, execution, or completion of a construction project. They typically occur when one party believes the other has failed to meet contractual obligations, such as delays in delivery, defects in workmanship, scope changes, or payment issues. Because construction projects involve multiple stakeholders—owners, contractors, subcontractors, consultants, and suppliers—the risk of miscommunication or unmet expectations is high, making disputes a common challenge in the industry. Resolving construction disputes often requires negotiation, mediation, arbitration, or in some cases, litigation. These disputes can cause project delays, increase costs, and damage professional relationships if not managed effectively. Many companies now adopt proactive strategies such as clear contract drafting, regular progress reporting, and transparent communication to minimize disputes and ensure projects are delivered on time and within budget. What are types of disputes in construction? Construction disputes can take many forms, depending on the issues and parties involved. Some of the most common types include: These disputes can significantly affect timelines, budgets, and relationships, which is why clear contracts, strong documentation, and effective communication are essential to prevent and resolve them. An example of a construction conflict A common example of a construction conflict is a delay dispute between a contractor and a project owner. Imagine a large commercial building project scheduled for completion in 18 months. Halfway through, the contractor experiences delays due to late delivery of steel materials. The contractor argues that the delay was beyond their control and requests an extension of time and additional payment to cover increased costs. On the other hand, the project owner claims the contractor should have planned better and refuses to grant extra time or money. This disagreement escalates into a conflict, requiring negotiation, mediation, or even arbitration to resolve. Without clear contract terms or accurate progress records, such disputes can lead to costly litigation and strained business relationships. How common are construction disputes? Construction disputes are very common worldwide (approximately 56% of construction projects) due to the complexity, cost, and number of stakeholders involved in projects. Large-scale construction projects often face delays, payment disagreements, or scope changes, making disputes almost inevitable if risks are not managed well. Studies show that disputes occur in a significant portion of projects, especially in sectors like infrastructure, commercial buildings, and industrial works. While the frequency varies by region and industry, global reports indicate that disputes cost companies millions of dollars annually and can delay projects by months or even years. This is why many contractors, consultants, and project owners invest in clear contracts, proactive risk management, and digital tools to minimize disputes and keep projects on track. Best ways to resolve construction disputes Negotiation The simplest and most cost-effective way to resolve disputes is direct negotiation between the parties involved. It allows contractors, owners, and other stakeholders to discuss their differences openly and reach a compromise without formal procedures. Mediation In mediation, a neutral third party facilitates discussions and helps both sides work toward a mutually acceptable solution. While the mediator does not make a binding decision, this method is often quicker and less adversarial than arbitration or litigation. Arbitration Arbitration involves presenting the dispute to an independent arbitrator, who reviews the evidence and makes a binding decision. It is more structured than mediation but generally faster and less costly than litigation, making it a preferred option in many construction contracts. Litigation Litigation takes the dispute to court, where a judge (and sometimes a jury) resolves the matter through a legal ruling. While it provides a definitive outcome, it is typically the most expensive and time-consuming method, often used as a last resort. Proactive Contract Management Many disputes can be prevented with well-drafted contracts, clear terms, and effective documentation. Regular reporting, defined responsibilities, and transparent communication reduce the risk of conflicts escalating into formal disputes. Technology Solutions Modern tools such as real-time progress tracking tools like Opteam, automated reporting, and schedule analysis help teams maintain visibility and accountability. By minimizing miscommunication and providing accurate records, technology reduces the likelihood of disputes and strengthens evidence if they arise. What is the difference between conflict and dispute in construction? In construction, conflict refers to a situation where there is tension, disagreement, or misalignment of interests between project stakeholders. Conflicts are common in day-to-day project management and may arise from issues like unclear responsibilities, design changes, or communication breakdowns. At this stage, the disagreement has not yet escalated into a formal claim or legal matter—it is more about differing perspectives that can often be resolved informally through discussion and collaboration. A dispute, on the other hand, occurs when a conflict escalates into a formal disagreement that cannot be resolved through normal communication. Disputes usually involve contractual or legal issues such as payment delays, project delays, or breach of contract. Unlike conflicts, disputes often require structured resolution methods like negotiation, mediation, arbitration, or litigation. In short, all disputes start as conflicts, but not all conflicts become disputes.
Free Construction Punch List Checklist (23 Items)

Free Construction Punch List Checklist as an Excel file with 24 structured columns, styled headers, and sample complex data rows. You can download it here: Free Construction Punch List Checklist 1. ID A unique identifier for each punch list item. It prevents confusion and ensures clear referencing in reports, meetings, and communications. 2. Category Defines the trade or system (e.g., Electrical, Plumbing, HVAC). Categorization helps organize issues, assign them to the right contractors, and quickly analyze trends. 3. Location Specifies exactly where the issue is found (floor, room, area). This avoids wasted time searching and ensures accountability for area-specific contractors. 4. Description of Issue A detailed explanation of the defect or task. Clarity here reduces back-and-forth questions and ensures the responsible party understands what needs fixing. 5. Priority Levels such as High, Medium, or Low. Prioritization helps allocate resources effectively, ensuring critical issues that affect safety or project deadlines are addressed first. 6. Responsible Party Indicates the contractor, subcontractor, or vendor accountable for resolution. This removes ambiguity and ensures clear responsibility. 7. Assigned To Names the individual tasked with completing the item. It personalizes responsibility, making it easier to track accountability and follow up. 8. Date Identified The date the issue was reported. This establishes timelines for accountability and helps track how long items remain unresolved. 9. Target Completion Date Sets the expected date of resolution. This enables progress tracking against deadlines and helps project managers forecast potential delays. 10. Actual Completion Date Records the real finish date. Comparing target vs. actual dates highlights efficiency, delays, or recurring bottlenecks. 11. Status Tracks whether an item is Open, In Progress, or Closed. A quick-glance indicator for overall project health. 12. Photos/Attachments Supports visual documentation of the issue. Photos minimize misinterpretation and provide proof of completion for disputes. 13. Inspection Required Indicates if QA/QC or third-party inspection is necessary. This ensures compliance with standards and client requirements. 14. Inspector Names the person performing the inspection. Identifying the inspector increases accountability and allows follow-up on inspection results. 15. Inspection Date Documents when the inspection took place. This helps keep track of quality checks and compliance. 16. Re-Inspection Required Indicates if a follow-up inspection is needed after initial fixes. This prevents unresolved or poorly executed work from being overlooked. 17. Re-Inspection Date Sets or records when the re-inspection is scheduled. Useful for scheduling and avoiding repeated delays. 18. Final Approval Marks whether the issue has received client/consultant approval. This is crucial for contractual closeout and payment release. 19. Approval Date Records when final approval was granted. Provides evidence for timelines and completion validation. 20. Comments/Notes A flexible field for additional details, clarifications, or instructions. Helps capture context that doesn’t fit neatly into other columns. 21. Impact on Schedule Assesses whether the issue causes project delays. Important for proactive risk management and claims preparation. 22. Impact on Cost Captures whether the issue increases costs. Provides transparency for budget tracking and justifications during negotiations. 23. Mitigation Plan Outlines corrective measures to resolve the issue. Prevents recurrence of similar problems and provides a roadmap for resolution. 24. Follow-Up Required Indicates whether additional monitoring or actions are needed post-resolution. Ensures continuous improvement and quality assurance.
Construction Punch List (Snag List) Explained

A construction punch list, also known as a snag list, is a document created near the end of a project that identifies work items that are incomplete, defective, or not in line with contract specifications. These items typically come from site inspections, quality checks, or client walkthroughs and can range from minor details—like touch-up painting or misaligned fittings—to critical issues such as safety hazards or unfinished installations. The punch list acts as a roadmap for contractors and subcontractors to correct and finalize outstanding tasks before the project reaches substantial completion. Beyond being a simple checklist, the punch list is an essential tool for accountability, quality assurance, and progress tracking. It ensures that project stakeholders have a clear, agreed-upon record of what needs to be resolved, aligning expectations between the contractor, consultant, and client. Since many contracts tie handover, final payments, or retention release to punch list completion, tracking these items directly influences both schedule and cash flow. Traditionally, punch lists are managed on paper or spreadsheets, making it difficult to assign accountability, track completion, or verify progress in real time. This often causes delays in closeout and disputes over responsibility. With progress tracking softwares like Opteam, punch list tracking is built into the project’s overall progress monitoring. Contractors can assign items directly to subcontractors, track deadlines, and verify completion through real-time site updates—all in one place. Why is a punch list called a punch list? It’s called a punch list because, traditionally, contractors would mark completed items on the list by literally punching a hole next to them with a hole puncher. This made it easy to see which tasks were done and which were still pending. Over time, the term stuck, even as the process moved from paper to digital tools where tasks are checked off electronically. In other regions, especially the UK and Commonwealth countries, the same concept is called a snag list, since it highlights “snags” or small issues that need fixing before completion. Whether you hear “punch list” or “snag list,” both terms describe the same thing: a final record of items that must be resolved to close out a construction project. Punch list construction sample Project: XYZ Office Tower – 5th Floor Fit-OutDate: 18 August 2025Prepared By: Site Engineer – John Smith Item No. Location Issue Description Responsible Party Target Completion Date Status 1 Meeting Room A Paint touch-up needed on north wall Painting Subcontractor 22 Aug 2025 Open 2 Lobby Light fixture not working above reception desk Electrical Contractor 20 Aug 2025 Open 3 Corridor Floor tile cracked near fire exit Tiling Subcontractor 25 Aug 2025 In Progress 4 Washroom (Male) Hand dryer loose on wall MEP Contractor 21 Aug 2025 Open 5 Office 502 Door hardware misaligned, door not closing properly Carpentry Subcontractor 23 Aug 2025 Open 6 Pantry Cabinet handles missing on lower cupboards Joinery Contractor 24 Aug 2025 Completed Who Is Responsible for Punch List Items? In a construction project, multiple parties share responsibility for punch list items, depending on the type of issue. Typically, the contractor and their subcontractors are directly responsible for completing the punch list work since they performed the original tasks. For example, if there’s a misaligned door, the carpentry subcontractor must correct it, while an electrical issue would fall on the electrical subcontractor. The general contractor oversees the entire punch list process, ensuring that each subcontractor addresses their assigned items on time. On the other hand, the architect, consultant, or project manager is responsible for verifying that the corrected work meets project specifications and quality standards. The owner or client often has the final say, reviewing the punch list and confirming satisfaction before project handover. In short, subcontractors fix, the contractor coordinates, consultants verify, and the client signs off—making punch list completion a shared accountability process that ties directly into final payments and project closeout. Since contractors, subcontractors, and consultants all play a role in punch list closure, Opteam centralizes communication by keeping a transparent record of who’s responsible for what, along with deadlines and progress status. This removes confusion and improves accountability. Common Items Found on a Construction Punch List 1. Interior Finishes 2. Doors, Windows & Hardware 3. Mechanical, Electrical & Plumbing (MEP) 4. Fixtures & Equipment 5. Exterior & Site Work Streamlining Punch List Management with Opteam Managing a punch list doesn’t have to mean endless spreadsheets, email chains, and delayed handovers. With Opteam, every punch list item is logged, assigned, and tracked within the same platform you already use for project scheduling and progress monitoring. Contractors can delegate tasks to the right subcontractors, consultants can verify completed work in real time, and owners gain a clear view of whether the project is truly ready for delivery. Instead of treating the punch list as a separate process, Opteam integrates it directly into overall project progress. That means the punch list closure rate becomes a measurable KPI alongside schedule and cost performance, giving teams a more accurate picture of project health. By simplifying communication, centralizing documentation, and linking quality closeout to progress tracking, Opteam ensures that construction projects don’t just finish on time—they finish right. Close Projects Faster, take Control Back with Opteam. Start your free trial today.
Generate an S-Curve For Your Primavera File Online (for free)
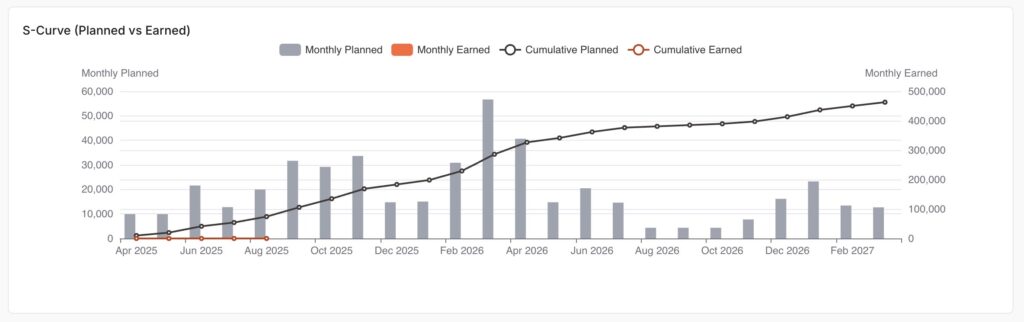
An S Curve in Primavera refers to a graphical representation of a project’s progress, costs, or resources plotted over time. It’s called an “S Curve” because, when plotted, the line typically forms an “S” shape, slow progress at the beginning, rapid progress in the middle, and slowing down towards the end. What are the typical uses of an S Curve in construction scheduling? 1- Progress Tracking: S Curves allow project managers to visually compare planned progress with actual progress over time. This helps identify delays early and monitor whether the project is on schedule. 2- Cost Control: By plotting planned versus actual costs, S Curves highlight any budget overruns or savings as the project moves forward. 3- Resource Management: S Curves can be used to track the allocation and consumption of resources (like labor, equipment, or materials), ensuring they’re used efficiently and spotting any over- or under-utilization. 4- Forecasting and Trend Analysis: They help in forecasting future performance by showing trends, which supports better decision-making and early intervention if problems are detected. 5- Reporting to Stakeholders: S Curves provide a simple, visual way to communicate project status, progress, and issues to clients, contractors, and other stakeholders. Why S Curves matter? S Curves play a critical role in project management, especially in construction scheduling, because they provide project teams with an at-a-glance understanding of a project’s performance. Instead of getting lost in spreadsheets and numbers, project managers can instantly visualize how work, costs, or resources are progressing compared to the plan. When an S Curve is used, any deviation between the planned and actual lines stands out immediately. This gives managers the chance to investigate and address issues—such as delays or budget overruns—before they escalate. The clear, visual nature of S Curves also makes them an ideal communication tool for stakeholders, who may not have the time or expertise to interpret detailed schedules or cost reports. Ultimately, S Curves support proactive management. They allow for continuous monitoring throughout the project lifecycle, making it easier to forecast future trends, justify decisions, and report status with confidence. This all leads to better project outcomes, fewer surprises, and happier clients. How S Curves Work in Primavera P6? Primavera P6 creates S Curves by gathering project data (like planned vs. actual progress, costs, or resources) and plotting it over time. Here’s the general process: Exporting for Advanced Analysis:For more advanced or customized S Curves, you can export data from P6 to Excel and build detailed graphs or combine multiple data types. Project Data Input:You build your project schedule in P6, adding activities, assigning resources, and setting up cost and baseline data. Baseline and Updates:The baseline (planned values) is set, and as the project progresses, you regularly update the schedule with actual progress and costs. Data Accumulation:P6 automatically accumulates the planned and actual values for each period (day, week, month), so you can see totals at any point in time. Generating S Curves:Using built-in reporting or the “Activity Usage Profile” and “Resource Usage Profile” tools, P6 plots the cumulative data as a line chart—the classic S Curve. Analysis and Comparison:The S Curve lets you visually compare planned vs. actual performance. If the actual curve starts to fall below the planned curve, that’s a signal there may be delays or cost overruns. P6 makes it easy to turn project data into S Curves so you can quickly track, analyze, and communicate project performance throughout the lifecycle. How to generate an S Curve in Primavera P6? (The Hard Way) 1- Open Your ProjectStart Primavera P6 and open the project you want to analyze. 2- Set or Confirm Your BaselineMake sure you have a baseline set. The baseline serves as your planned progress or cost reference. 3- Update Project ProgressEnter actual progress, dates, and cost/resource updates so P6 has up-to-date information to display. 4- Go to Activities ViewNavigate to the Activities window. Here, you’ll find tools to visualize project data. 5- Open Activity Usage ProfileFrom the toolbar, select View > Activity Usage Profile.This feature displays a graphical profile at the bottom of your screen. 6- Configure the ProfileRight-click in the Activity Usage Profile area and choose Resource Usage Profile Options (or Activity Usage Profile Options depending on what you want to show: costs, labor units, etc.).Select Cumulative to display S Curve-style graphs. 7- Choose Data to DisplayYou can select to display Budgeted (Planned), Actual, and Remaining values. Enable both Cumulative Budgeted and Cumulative Actual to see the S Curve comparison. 8- Analyze the S CurveThe graph now shows your S Curve: 9- Export the Data (Optional)If you need to create more detailed or customized S Curves, you can export the data to Excel for further analysis and formatting. Generate an S Curve for your Primavera P6 file in seconds using Opteam (The Easy Way) Stop wasting hours trying to extract and plot S Curves from Primavera P6. With Opteam, you can instantly visualize your project’s progress and read your XER file online. How it works: It’s that simple.Skip the spreadsheets. Impress your team and stakeholders with professional, ready-to-share reports. Try it now and see your Primavera P6 schedule in a whole new light.
Open Your XER File Without Primavera (Online & Free)

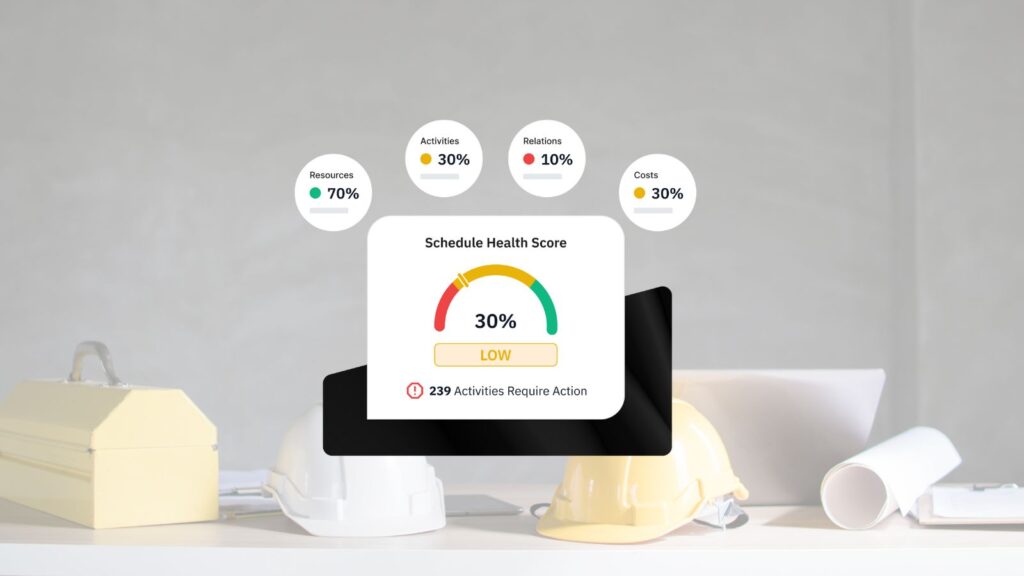
Have an XER file (Primavera P6 file) in hand and want to open it without Primavera? You’re in the right place. Follow the following steps to do it using Opteam construction progress tracking software, and visualize it with powerful dashboards, spot errors & get instant AI suggestions to fix them. 1- Create your free Opteam account here. 2- Upload your XER project file (drag and drop). 3- Fill out project details and assign a manager (optional). 4- Assign tasks to different team members and get instant progress updates through automated Whatsapp messaging. 5- That’s it, you can now access a complete dashboard that has a schedule health score for your XER file, with instant AI generated suggested fixes for it. Watch: See How Easy It Is to Open XER Files Without Primavera Benefits of Using Opteam to Open and Analyze XER Files without Primavera Opening and analyzing XER files no longer requires expensive Primavera licenses or complicated software setups. With Opteam, you can upload your XER file in seconds and get powerful insights instantly. Here’s why construction professionals are switching to Opteam: 1. No Need for Primavera Installation Primavera P6 is powerful—but also heavy, costly, and technical. Opteam lets you view and analyze your XER file directly in your browser. No software downloads, no IT involvement, no training required. 2. Instant Dashboards & Visualizations Once you upload your XER file, Opteam transforms raw schedule data into easy-to-understand dashboards. Spot delays, bottlenecks, and risks without spending hours digging into activity logs. 3. AI-Powered Schedule Health Checks Opteam doesn’t just show your schedule—it interprets it. Our AI engine scans for common planning errors, unrealistic sequences, and data gaps, then gives you instant suggestions to fix or improve the schedule logic. 4. Team Collaboration Made Simple Easily assign tasks, track progress, and receive field updates—right from within the platform. Opteam even integrates with WhatsApp to automate communication with site teams. 5. Shareable Insights for Clients & Stakeholders Impress your clients or internal stakeholders with clean, professional dashboards you can share as live links or export as PDF reports. Everyone stays informed, without needing Primavera access. 6. Free to Start Get started with zero cost. Upload your XER file, explore the platform, and see how much easier construction scheduling can be. Who Uses Opteam? Construction Consultants, Contractors, and PMOs Opteam is built specifically for professionals who need to track progress, analyze delays, and defend their schedules—without wasting hours in Excel or struggling with outdated tools. Here’s how different teams use Opteam to stay in control: 🏢 Construction Consultants Consultants use Opteam to: 🏗️ Contractors & Project Managers Contractors rely on Opteam to: 🧩 Project Management Offices (PMOs) PMOs use Opteam to: Whether you’re a claims consultant, site engineer, planning manager, or PMO director—Opteam turns your XER file into a living, breathing source of truth.
Drones Construction Progress Tracking: The Future is Here

Okay, let’s cut the fluff. You know what’s actually wild? Most construction companies still rely on old-school checklists, “walk-arounds,” and half-baked WhatsApp photos to check up on construction progress. Meanwhile, the rest of the world is flying robots over job sites, capturing a bird’s-eye view, and turning thousands of photos into crystal-clear, 3D maps. Ever had that moment where you’re sure the crew poured the concrete… until you show up and see a muddy mess instead? Yeah, we’ve all been there. But now, drones are out here making “trust, but verify” a whole lot easier. With smart tech like AI image analysis and instant cloud uploads, progress tracking has leveled up—way up. Companies are already saving weeks of guesswork and loads of cash by switching to drone-powered site surveys, and the numbers prove it, project managers using drones have reported up to 50% time savings and far fewer disputes (check out these stats from Deloitte’s latest report). The future of construction progress tracking isn’t just coming, it’s basically hovering right above your hard hat. Let’s dig into why drones construction progress tracking is flipping the script, and how you can get in on the action before everyone else does. What is Drones Construction Progress Tracking? Drones construction progress tracking is the use of unmanned aerial vehicles (drones) to monitor and document the development of a construction project from above. By flying drones over a site at regular intervals, teams can capture high-resolution images, videos, and even 3D models, providing a clear and up-to-date overview of the entire project. This approach gives stakeholders a reliable way to see exactly what’s happening on-site without needing to be there in person. With the data collected, specialized software stitches images together and creates visual reports, making it easy to compare progress over time, spot potential issues, and keep everyone on the same page. Drones save time, boost accuracy, and bring a new level of transparency to construction progress tracking—helping projects stay on track and making delays or problems harder to miss. How it Works? Drones construction progress tracking starts with planning scheduled drone flights over the construction site. The drone captures high-resolution images, videos, or 3D scans from multiple angles, providing a detailed visual record of the project at every stage. This aerial data gives project teams and stakeholders a comprehensive and up-to-date view of site progress, without relying solely on ground-level reports or manual site visits. Here’s how the process typically works: By automating site documentation and offering a bird’s-eye view, drones make construction progress tracking faster, more accurate, and much easier to share. This helps keep everyone aligned, reduces the risk of surprises, and supports better decision-making throughout the project. Benefits of Drones Construction Progress Tracking Drones construction progress tracking brings a host of advantages to any project, changing how teams monitor, document, and communicate progress on site. Instead of relying on outdated or incomplete information, drones deliver real-time visuals and data, giving everyone a clear and reliable view of what’s happening. Key benefits include: Overall, drones make construction progress tracking smarter, faster, and more reliable—helping projects stay on schedule and under control. Best Drones For Construction Progress Tracking When it comes to construction progress tracking, not all drones are created equal. The best drones for the job combine high-quality cameras, long flight times, and smart features like automated flight paths and easy data integration. These drones help construction teams capture consistent, accurate site data with minimal hassle, making progress tracking smoother and more reliable. Some of the top drones for construction progress tracking include: Choosing the right drone depends on your project size, required data detail, and budget, but investing in a quality drone ensures you get the consistent, actionable site data you need to keep your construction projects on track. What are the Problems with Drones in Construction? While drones have transformed construction progress tracking, they aren’t without their challenges. Even with all the tech advantages, there are practical, legal, and operational hurdles that teams need to keep in mind before launching a drone on-site. Common problems with drones in construction include: Despite these challenges, most can be managed with planning, proper training, and the right technology. Being aware of these pitfalls helps construction teams get the most out of drone progress tracking—without running into unnecessary surprises. Automate Progress Tracking with Opteam Stay on top of every detail without chasing updates or sifting through endless paperwork. With Opteam, your project progress is tracked automatically, site photos, daily reports, and real-time dashboards all in one place. You’ll spot delays before they cost you, keep clients in the loop without the back-and-forth, and finally get a clear, honest picture of what’s happening on your site. With Opteam, progress tracking just works, so you can get back to building.
Critical Path Segments (CPS): The Ultimate Progress Tracking Methodology

Recorded on 15th March, 2025 Missed the live session? Watch the full recording now and discover a groundbreaking method that’s changing how construction teams track progress, identify delays, and recover faster. 🔍 What You’ll Learn: 🧠 Why This Matters Progress tracking isn’t just a formality—it’s your first line of defense against delays, claims, and cost overruns.But when updates are late or fragmented, your project loses its edge. With OPTEAM’s CPS methodology, every moment on-site is accounted for:🕒 Slowdowns, stoppages, photos, daily logs, and even messages—automatically stored as time segments in one place. 👷 Who Should Watch 🎙️ Presented By 🎥 Watch the Webinar Recording Now Fill out the form below to get instant access to the full 45-minute session and see how CPS is making traditional progress tracking obsolete.